Filter Quickly by Topic

Sunday, December 12, 2010

How to use iTunes, Winamp and Shoutcast to be a DJ in SL

In a previous blog post, I talked about how to set up Reaper to broadcast into SL.  Reaper is my music composition software (a DAW; Digital Audio Workstation), so I thought it was fortunate that I could go from it straight into SL.

I don't use Reaper any more.  It has it's benefits, but it's disadvantages have been the song information that normally appears on the DJ boards, doesn't appear using the Reaper solution.  Not a problem for me as I do development and to write scripts and code to overcome this problem isn't an issue.  Not technically anyway.  But with Reaper, it took time to go from a DJ Set to that kind of set up, and since I'm lazy ... it took too much time.
These days I use Winamp.  Everything that Reaper was providing for me before, specifically cross fading, can be done with Winamp except I cannot have a live voice over.  Not that I needed it before, I tend to produce a set and play it.  Probably a good thing, I'd end up blabbing the entire time. 

Winamp
So this is my new setup.  A nice diagram kind of gives the full view of how it works; click it to expand.  It's no more complicated than drag-and-dropping of tunes on to a playlist, connecting to Shoutcast, then clicking play in Winamp.  

Once I pick all my songs, I randomize the list a few times, the put my few lead off songs on top and closing songs on the bottom.


The Source of the Plugs-ins are:
  1. SHOUTcast - This transmits tunes from Winamp into a Shoutcast server.  The URL of the server is the Media URL on the land parcel.  You get this plug in from Shoutcast, scroll to the bottom of the page: http://www.streamsolutions.co.uk/downloads/DSPs/shoutcast-dsp-1-9-0-windows.exe (Windows only).
    • Important Note: I had a problem in Windows 7 with the 2.x plug in so the link here is to the 1.9.0 plug in and it seems to be working a lot better.  Now, I don't use a SHOUTcast 2.x server, and this plug-in will not work if you have that version.
  2. Crossfading - This merges the ends of songs with the beginnings of songs so that one fades into the next reducing the amount of dead air that often exists at the start/end of songs.  This plug-in is available in the Winamp media library, but a more up-to-date version is here: "SqrSoft Advanced Crossfading v1.7.6 (http://www.brothersoft.com/sqrsoft-advanced-crossfading-output-197719.html)".  
  3. BigClock - This plug-in is used to know how much time is on a playlist and how much time is left in a set for good transition between on DJ and the next.  This plug-in is obtained here: http://www.winamp.com/plugin/nxs-bigclock/144111 

Configuration


The next stage is to configure the Crossfading Plug In to go into the Shoutcast Plug In.  Start Winamp, and go into Preferences (Ctrl+P), find the Crossfading Plug In, and click Configure:


This brings up the Crossfading Dialog box, and you'll want to go to the DSP tab and set Shoutcast as your output source:

This should bring up the Shoutcast plug in right away, but if it doesn't, click Configure in the middle of the page.  Once you have this plug-in set, you can now specify how you want to encode your music and specify the passwords to your shoutcast server.  If you have been provided a password but no user name, then your shoutcast server is version 1.  Version 2 servers require a user name.  I my case, I'm using version 1, so my configuration looks like this:


I don't broadcast the source to the yellow pages:


And set the Encoder.


I have found that 80kbps 22Khz Stereo is pretty adequate for most people.  Anything more and you're wasting bytes as most people cannot perceive the differences in sound quality.  I only bump it up if people make mention of it.


Playing Your Set


Once you are ready to go.  It's only a matter of connecting to your Shoutcast Server, and clicking Play on Winamp.


Monday, October 4, 2010

How to use iTunes, Reaper, Shoutcast and an Announcer script to be a professional looking DJ in Second Life

This is going to be one of those work in progress posts that describes how I became a DJ in Second Life. I've wanted to do this for some time, and as it turns out, already had all the tools to do it without one plug-in which I have now obtained.

Firstly, I use an Digital Audio Workstation (DAW) called Reaper (http://reaper.fm). A DAW is an audio composition tool for overlaying multiple sounds. It's what professional composers use to produce the music you listen to, and can run into the thousands of dollars.

Reaper is normally $225, but if you make less than $20,000/year from your music, they will sell you a discounted license for $60. Don't let it's price make you think it is sub-standard; it's amazing quality for what you get. As well, there is new release with new features every 2 weeks, so one license gets dozens of upgrades for free.

For me, I would pay more than $225 for it, because it provides me with features that $1000 DAW give. I started out with Sony ACID Studio and Pro, but found I couldn't run two Virtual Instruments (VSTi) at the same time. I got turned on by the richness of sounds from Spectrasonic's Stylus RMX and Atmosphere (and later Omnisphere), and you can sync the beat track of RMX to Omnisphere. But not having a tool means those programs are worthless.

Reaper is way more functionality than most people need to be a DJ in SL, but it does offer three huge benefits that other posters overlook. Cross Fading, Rendering and Projects. These are all part of Reaper, so there is no need to get a ton of technology and figure out how to make it happen.

Cross Fading is the ability to end one piece of music while beginning another. Doing this can be done graphically ... by simply dragging one piece of music visually over the other and you're done. Cross Fading can be a bit of a challenge if one song has a bunch of silence a the end or at the beginning, so in Reaper it easy to cut stuff off the beginning and end of a song before you do the cross fade.

Rendering is the ability to take your completed show and render it as a single result, and that result can be any in any audio format you want.

Projects are the ability to save your 2 hour sets so that they can be reloaded and played back easily. For me, this means producing a set of shows that I can use in other venues, or at least that's the idea.

Since Reaper is a DAW, I can also remix songs with it. I've never had the need/ability to techno-fy my chill-out music, but with tons of that kind of music it will be an interesting experiment. One of my VSTs is RMX which allows me to overlay beat tracks to the sounds. Omnisphere also has beats, but it's more of a synth designed for smoother sounds, plus millions of combinations of sound possibilities. That means I can mix the sounds together and play them back live into SecondLife for a really special result.


Kbs (Kilobits per Second)

Back in the day when CDs were first created, the CD format allowed for 72 minutes (and later 80) of sound. Rumor has it that it had to be long enough to fit one of Beethoven's symphonies on it uninterrupted.

It used 44,000 Khz and 16-bit stereo sound in a raw format eating up 176,000 bytes per second of CD space, or requiring 725 Mb for the 72 minutes of time. To transmit a byte on the Internet, 2 extra bits are used, so 176,000 bytes/sec, 1,700 Kilo bits per second (Kbs).

That's a lot of bits to push around, and unacceptable as a medium for transmitting sound over the Internet. But since then, different audio formats have come along that use a lot less bits to transmit the music. Seems our ears aren't all that great for hearing the high and low ends of the music, so it's wasteful to transmit them. New formats can stream out a similar but still high quality sound using only 128 Kbp, over 13 times less space.

iTunes

I use iTunes to organize my music library, because it reads most formats and I can convert them into MP3's which I use to broadcast with.  I use a global playlist contains all of the tunes that I create my sets with.  I don't use Genre in iTunes because I have Trance, Dance, Breaks, Progressive House, House, etc. in my sets.

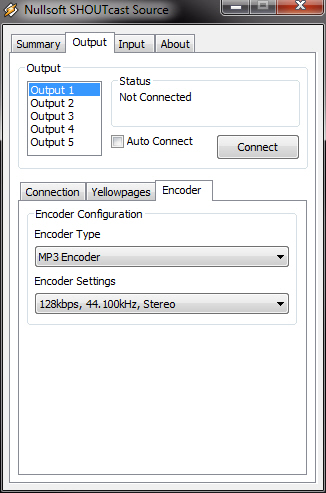
Before you can convert to MP3, you have to tell iTunes that is the format you want.  To set it, go into Edit ::: Preferences, and select Import Settings:


Then from the next dialog, select MP3 Encoder from the "Import Using" drop down:


Next I start playing the play list and go into shuffle mode to play the playlist in random order.  This gives me a random selection of tunes.  If there is a tune I like that isn't MP3, I can convert it to an MP3 version.

Once I have the MP3 Version, I update the "grouping" to identify which music goes into what sets, and I can prevent the same piece of music from being reused so that there is a unique show each time.  By going into "Get Info" (a little further up the menu shown here), and setting the grouping.  Now I can sort by the grouping and see all the music in a set:

This process simplifies the set arrangement process by ensuring that I get all the musical pieces in a single group.  If you want to order the compositions for arrangement, see below, suffix the grouping name with a number like "-01", "-02","-03", and so on.

Once you have a set of music, you can figure out how much time you have for it.  First, make sure you have your music library selected and not a playlist, by selecting Music under Library:


Then select all the tunes in your grouping, and at the bottom of the iTunes window, it will give you this statistic:

If it doesn't give you the precise time, then click the area first to switch the value to an exact time rather than an approximate time.

I always make sure the amount of time is about 2 minutes more than the set time, so that I can handle cross-fades and get the set time to exactly where I want it 2, 3 or 4 hours.

The Annoucer (Optional)

While Shoutcast supports the ability to announce whatever the current tune is, reaper doesn't.  Even if it did, I don't like the detail it gives and a viewer has to be able to support reading the stream.  Therefore I wrote my own shout cast Announcer which is part of my tip jar.  If you want the script, then send me a notecard IM in game and I'll arrange to get it to you.  The script took a lot of time to write and has a fee and will eventually be available in the Second Life Marketplace. 

My song announcer reports this information in this format using the special second life characters:
╔╦═════════════════════════════════════════════════════
║╟─✸ Set: Progressive Dance 1
║╟─✸ Song: 3 of 17
║╟─✸ Name: Endless Candy - Original Mix
║╟─✸ By: Weekend Heroes
║╟─✸ Album: Armada At Ibiza - The Closing Party 2010
╚╩═════════════════════════════════════════════════════
The SET is the name of the set of songs being played, and Album gives the release I got it from so that others can more readily find it.

To get this information into second life requires an export from iTunes and a different one from Reaper.  I then edit the output using OpenOffice and then read the two sets using a Second Life script.

iTunes Export for Announcer (Optional)

The first step is to get all the tunes from the set into a play list.  This is an easy drag-and-drop process to create the playlist.  Once you have the playlist, right click the name and select "Export..." from the menu:
Pick the first option in the type "Text Files (*.txt)" and specify an appropriate name.  I use "ITunes-PLAYLIST" .. so, "ITunes-Progressive Dance 1".


I then export the file again, but instead of saving it, I right-click the file I just created, and use the "Open With" ability and open it in Open Office.  This saves having to fine the file after it is saved.


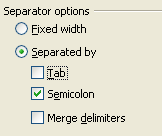
I then specify the Separator options as Tab:
Then click OK to open the file.  There are are four columns we need from this file, so all the columns except for:
  1. Name
  2. Artist
  3. Album
  4. Location
Are deleted from the file.  Location is used to cross reference a start time in the Reaper file.


IMPORTANT PRIVACY NOTICE: Before continuing to the next step, have a look at the names contained within the Location column.  Since this file will eventually be copied into Second Life, MAKE sure it doesn't contain any personally identifying information.  In my example, I use a separate hard-drive partition (P) to save details about my songs, but many people use "My Documents" and this often contains your real name.  My recommendation is to use a "replace" operation to change the name of any private information.  Whatever modifications you make, they have to be consistent, because the system matches against the FileName column in Reaper against the Location name in iTunes.  If they are not the same, the load fails.  See below.

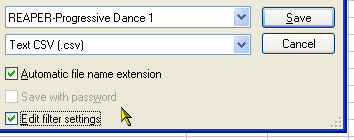
Review the columns to make sure all the information you want is included, then save the file using the type "Text CSV (.csv)" and remember to check on "Edit Filter Settings":

By clicking on Edit Filter Settings, you get another dialog box.  Specify the field delimiter as a tilda (~) and the text delimiter as nothing:


Then click OK to save the file.


iTunes to Reaper


Now start up Reaper, start a new project, add a track, and drag the all the files to the track in reaper.  In iTunes, click and hold the left-hand mouse button, then drag to the right the files.  This will pop open a drag image identify the number of tunes you are dragging:
and drag the files to the left-hand side of the Reaper track:


It will ask you if you want the files on a single or multiple track, click "NO" to put everything on a single track:


Now Reaper then lays down all the audio track side-by-side.  They appear red in this image because I have changed the colours in my environment.


The next step is to cross fade the selections.  The first stage is to trim off low volume parts of the music at the end (or start) of a musical selection.  Move your mouse to the edge of a song and when you see this cursor, click and drag the mouse left/right to trim the music:

TO:


Now start playing the music.  Doesn't matter were exactly, just that it has to be playing, and drag the music so that it overlaps, and let go of the mouse.  When you do the music position is moved a little to the left of the cross fade so you can hear the entire cross-fade. 

Listen to the fade to make sure it sounds correct, or shift the starting point/overlap until it sounds good.  Some times you have to turn snapping Off (Alt+S) to make it align better.

Now repeat the process for the entire set, and save the project.  Now listen to the set and make sure there are no glitches in the music and is what you want it to be.

Reaper Export for Announcer (Optional)

 This is the second half of the export required to seed the script in Second Life with accurate song, artist and album information.  Inside Reaper, after saving the project as an RPP file.  Save it again:

And save it as a "EDL TXT (Vegas) (*.TXT)" File type.  I prefix the file name with REAPER to differentiate it from the iTunes export files:

Like the iTunes export, save it again as TXT and use the Open With to open the file in Open Office.  This time open with semi-colons and make sure TAB is turned off!!

Delete all the columns except for:
  1. StartTime
  2. FileName


IMPORTANT PRIVACY NOTICE: Before continuing to the next step, have a look at the names contained within the Filename column.  Since this file will eventually be copied into Second Life, MAKE sure it doesn't contain any personally identifying information.  In my example, I use a separate hard-drive partition (P) to save details about my songs, but many people use "My Documents" and this often contains your real name.  My recommendation is to use a "replace" operation to change the name of any private information.  Whatever modifications you make, they have to be consistent, because the system matches against the FileName column in Reaper against the Location name in iTunes.  If they are not the same, the load fails.  See below.

Then do a save as "Text CSV (.csv)" and make sure Edit filter settings is turned on:

In the subsequent dialog make sure the Field Delimiter is a "~" and the Text Delimiter is blank:
Then Click OK to save the file.

Reaper to Shoutcast

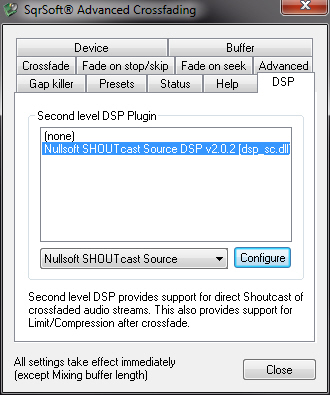
Shoutcast is technology that takes an input (your music from Reaper) and distributes it to one or more listeners.  Reaper has a plug-in to enable this, and can be found here:


Download the appropriate plug-in for your Windows OS (32 or 64 bits).  And save it in the "plugins" directory for Reaper.

Next download the latest "lame_mp3.dll" encoder, which you can find here:


Install this in the same directory as the "reaper" application.  DO NOT install it in the plugins directory.


Now bring up the plug-in, by using the "Save Live Output to Disk" (Ctrl+Alt+B), which is found on the "File" menu.


This brings up an initial dialog where you select Shoutcast Source:


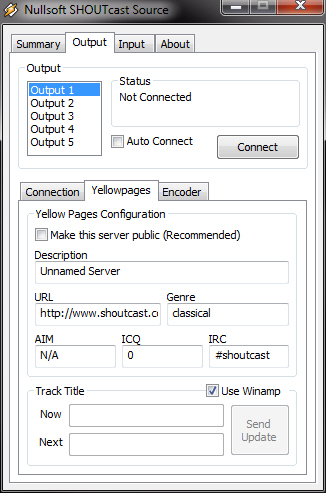
You have to click START to see the start parameters.  When you signup for a shoutcast service in second life you will get an IP, Host and Password.  Simply separate the IP and host with a colon, for example if the IP is "231.77.82.199" and the port is "4212", then Host:port is set to "231.77.82.199:4212".  Finally, set the appropriate password:

Connect and when you are connected, simply click play in Reaper and pat yourself on the back .. you are broadcasting!!

It does take 10-30 seconds for your music to leave your computer, be transmitted to the shoutcast server and rebroadcast to the Second Life residents.

Copying ITunes & Reaper Export to Second Life for Announcer (Optional)

The script works only with the files specified above.  For each set you copy the contents of the two CSV files you created previously, and copy them into a notecard.  In Windows, this is simply, open them in any text editor such as Notepad or Notepad++.

Once opened, in Notepad, press Ctrl+A (Select All) then Ctrl+C (Copy), to copy the text into the clipboard.  In Second Life, create a notecard.  The notecard name is either prefixed with one of these two to indicate it's type.
  • !ITunes-
  • !Reaper-
After the dash, you place the name of the set.  IMPORTANT, the name of the set must be the same on both files:
Open the notecard, and paste the clipboard contents (from Notepad) into the Second Life Notecard:

Repeat the process for the Reaper export file.

Now, make a copy of each of the "!Tunes" and "!Reaper" notecards in an object with the "!!Shoutcaster" script you acquired earlier.

Using the "!!Shoutcast Announcer" Script (Optional)


The "!!Shoutcaster" script uses the command line on channel "555" to work and only supports the Owner of the script, so somebody else typing these commands, beside yourself will have no effect on the script.  There are 4 commands, and they are listed in roughly the order you would use them.  The commands can be in upper and lower case.  For example "/555 Stop"
  • LOAD
  • DELAY
  • SYNC
  • STOP
LOAD tells the script to load a set from the notecards present.  Loading first loads the Reaper notecard which gives the start times and sequence of the tunes and then it loads the ITunes notecard which gets the song name, artist name and album information using the filename as the cross-reference between the two.  The name you provide is your set name:
  • /555 load Progressive Dance 1
    • Loads the "Progressive Dance 1" notecard for iTunes and Repear
DELAY is the combination of two numbers.  The default is 45 seconds.  The first number is the number of seconds it takes for your sounds to leave your computer, travel to the shoutcast server, then end up on your listeners computers.  In my case, this is about 25 seconds.  The second number is the number of seconds into the tune before the script identifies the song.  In this case, it is 20 seconds.  Total 45 seconds.

To change the delay, simply specify a new value.
  • /555 delay 33
Sets the new delay to 33 seconds.

SYNC is used to tell the script where in the song Reaper is currently playing.  You look at Reaper, and decide upon one of two formats for the SYNC command.  The timer contains beats and seconds, seperated by a "/".  We are interested in the value after the "/".  It accepts a time with minutes and seconds (MM:SS) or with hours too (HH:MM:SS):

Contains just the minute and seconds.  Ignore the stuff after the ".".  The sync command therefore is:
    /555 sync 12:24
Contains the hour, minute and seconds.  Ignore the stuff after the "." and the sync command therefore is:
   /555 sync 1:48:56

Since these commands are being entered as Repear plays, you will need to enter a value up to 10 seconds in the future, and count down your "ENTER" key press in Second Life when the time matches.  Once this occurs, the script will then play the current song that is playing according to Repear's current position and relative to the delay value you have specified earlier.

The SYNC command doesn't need to be incredibly accurate, it can be out by a few seconds, because different avatars in second life will receive your sounds at different times because their distance from the Shoutcast server.  This is why the default delay is 45 seconds and not 25.

STOP stops the script from broadcasting the current song.  Stop automatically happens after the last song is annouced.

Final Two Words

Have fun!

Monday, September 6, 2010

Second Life Machinima with Fraps and Vegas - How To Guide

Well isn't this fun ... yet another way to express my creativity, if The Chamber and Quantum Matrix weren't enough, there is now Machinima.  This is my "How To" guide on how to use Second Life, Fraps and Vegas to produce high quality second life videos.

It's more about my experience doing it for others to learn from my experience.  This can be a bit of a technical blog on the subject, but it should give you insight into maximizing the capability of your computer's hardware to produce the best results for Second Life.

Software

The software that I use is Fraps, an alternate SL Viewer (Emerald/Phoenix) and Vegas Pro, though I have been playing with a recent version of the cheaper Movie Studio HD and it seems to have most of the features of the Pro version I use, so you don't have to spend a lot for a good editing platform.

Saitek Cyborg Evo Force

Hardware

Hardware is a different issue.  Until recently bought a new machine.  So I have Windows 7 with an Intel quad core I5 and ATI 5850 graphics which puts me in the top 15% for quality.

The other hardware I use is 4 axis joystick, specifically a Saitek Cyborg Evo Force. This device is nice because it has a rest for your hand.  This is describe more in the Joystick setup section below.


Hard Drive Considerations

Technically a 7200rpm hard-drive can write out about 70Mb/second.    If you decide to use an external hard-drive on a USB 2.0 device, the USB controller can write out at about 33Mb/second.  Most hard-drives are of the 5400rpm variety and write out at around 50Mb/second.

On a 5400rpm drive, which gives about 50Mb/second, expect to get only about 35Mb/second because this the average write speed of the hard-drive.  It comes from the time it takes to transfer data in the CPU and other stuff, the older the computer the more delay is introduced, because the CPU and member cannot keep up with the demand.  Depending on your computer it can range from 25-50Mb/second on a 5400rpm drive.  In my environment, the video capture writes to a 7200rpm drive, which means I can probably get close to 30 frames/second assuming the graphics card can render a scene that fast.  But it rarely does.  Usually 8 frames/second in highly complex scenes, so to compensate, I move slowly through scenes then speed up the video in Vegas to compensate.

Hardware Thrashing

Before you can begin recording your videos, you need to think about thrashing.  This where you overload the CPU, disk drives, GPU and network when recording videos because recording the screen is very intensive, and may tax your computer beyond the capabilities the hardware.

CPU trashing occurs because the CPU is dedicated to the task which is recording the screen.  Every application you have takes away from the CPU.  Most software on the PC is services and cannot be shut down but your major software like Word processors and even the video editing software will slow down the video capture.  For the best results, close everything you don't need.  Just run the basic set of programs so that you don't interrupt the CPU with non-essential requests.  This also includes things in SL, such as shutting down AO's, HUDs, setting your avatar to busy to prevent a bunch of messages from appearing, and other things on your avatar that might require CPU.  Even small numbers of non-essential interrupts, are really subtle, but a lot of them will introduce slight pauses to the video.

Hard Drive with the Platters Exposed
Drive thrashing is a little bit more difficult to understand.  A hard-drive is named because the media it reads and writes from is on a hard platter.  Hard-drives have many platters and Second Life and Fraps will read and write from different parts of the hard-disk.  Disk Thrashing occurs when the computer has to go to one area to read Second Life data and a different area to write out video.  Like CPU interrupts with non-essential software, the time it takes for the hard drive to physically move the head to another track leads to delays.  It's only 1/100th of second to move the head to the other track, but the delay is cumulative.  The trashing bit is the fact that the head has to move back and forth several times per second.  Doing it 10 times a second adds 1/10th of a second delay, and when you want to record video 30 times a second, 1/10th of a second is actually a long time.  Disk caching can take care of this for you normally, but when you are writing a lot of data, no amount of caching will prevent this.

In my environment I have two disk drives.  My "C:" contains second life cache data and my "M:" drive is where I write my videos.  I completely eliminate this track to track seeking because there isn't any.

GPU (Graphics Processing Unit) is the thing that actually displays your graphics. In the past, it used to be the responsibility of the CPU to figure out what you are looking at, and now, the CPU's job is to describe to the GPU the contents of the scene, there is a box here, a sphere there, and so on.  The GPU then breaks the scene down into polygons and that's how it figures out that the box is in front of the sphere, to show it correctly.  In Second Life, all those primitives, sculpty and textures are described in a scene in front of your camera, up to 512 meters away.  This means the viewer has to gather up all the objects and their textures from the second life server and put them on your hard-drive.

If you are on a full simulator with 15000 primitives, that is a lot of information to transfer.  But if you are now moving through that scene, your GPU must first get scene components and render them.  When you add moving primitives, the server is telling you where the new object is, so your network in involved, and if it's slows the entire process down.

In Second Life, when I arrive at a new sim, I usually set the render distance to 512 meters to gather up all the objects the viewer can see, then set it lower when a scene is being rendered, this way there is no need for the viewer to go to the server to load objects which will result in a significantly slower result.  My networking speed is 15 Mbs or about 1.5 MB/second.  It's the slowest of the components.  I can get 100Mbs but, if I could afford it, I'd rather buy tier on a sim than pay for Internet.


Viewer Setup - Joystick Controls

I've seen my joystick new recently for $30.  Other people use a Space Navigator.  It's a little harder to get and can be a bit pricey.  $99 to $250 depending on the model.  While I haven't use that device, I have used ones similar to it, and I think a joystick will work better because your entire arm is controlling the device rather than just your wrist and hand.  As well, you can use your other hand to control the throttle.  Translation, you will have better smoother control over subtle movements in your video.

My joystick has a forward, backward, twist, and rocker control on the back, which I use for pitch, roll, yaw and throttle respectively, which in SL terms is Pitch, Roll, Yaw and Z-Axis Mapping.  You will need to play with your controls for what works best for you, but in SL's Joystick setup these are my settings.  You reach these settings in the preferences, by click Joystick Setup in the Input & Camera tab:


You'll probably wonder why the roll is negative.  It's to handle the fact that pulling the joystick to the left will cause the view to roll right instead of left as you might expect.

When mapping the joystick, you'll need to look at the Joystick Monitor on the right of the window to know which axis to use for what.  I don't use zoom mapping, so I set the axis to -1.  If you use the same axis for more than one control, you might get weird results, but it could also be useful too.  For example, in an aircraft in real life, if you bank to the left, the plane with cut the air and turn the aircraft left.  You could use this ability to implement a small about of X Axis mapping as you roll.  Without it, the camera simply rolls without giving this turning effect and that might not look realistic.

You'll notice that Auto-Level is checked off.   It's useful to turn this off if you are flying, but when you are moving around on flat ground, turning vertical is very disconcerting.


Viewer Setup - Graphics Quality

Graphics Quality settings affects the overall result.  While I can run in Ultra with water reflections turned on and all my quality settings set to the max, it's not necessary to maximize the quality.  If you are moving through a scene, you only need as much quality to display the object at an acceptable quality.  In many cases, you don't need to set anything but texture quality to good or high.  It's an area to experiment in if you get choppy video.

Viewer Setup - Windlight Settings

I use the Phoenix Viewer because it gives me access to a lot of Windlight light settings.  For those of you who don't know, Windlight is a 3D photo-realistic graphics colouring library.  It allows the viewer to apply additional colours and textures to the 3D graphics information before it is displayed on the viewer.  I use a setting called "Fine Day" that increases saturation and contrast of the graphics.  This makes the images appear crisper.

Viewer Setup - a clean HUD and Interface

Other setup includes removing the objects on your heads-up-display (HUD).  On Phoenix, the Ctrl+Shift+H is used to toggle the HUD objects on/off.  Ctrl+Alt+F1 toggles the interface on and off.  On Imprudence it is Ctrl+Shift+F1.  Turning the interface on and off requires the advanced menu to be turned on, and that's reached with Ctrl+Alt+D.

Now you should have a completely empty view free of distracting elements.


Viewer Setup - Disable Camera Constraints

Disabling Camera Constraints is an absolute must to do any kind of video.  In most viewers, it is in the Advanced Menu near the bottom of the menu.

Viewer Setup - Screen Resolution

The next consideration is the screen resolution.  That drives how many frames you can write out.  My large monitor supports 1680 x 1050, but I record videos at 1280 x 768 and SL runs in a window.  Therefore my output is 1280 x 716 pixels, slightly smaller than YouTube's 720 lower HD amount, which in Vegas puts two almost unnoticeable lines above and below your video.  If you are publishing to the lower HD resolution use the lowest resolution possible.  Recording at 1680 x 1050 but publishing 1280 x 720 pixel videos means you are writing out a bunch of pixels you are going to throw away later.  This makes your frames per second to be much slower, and in my case, by a factor of 2.

To understand what this really means, Fraps does full frame capture using the DirectX libraries that are associated with your computer.  That means that every frame it can write out it uses all the bytes on the frame without any kind of compression.  So one frame at 1680 x 1050 x 3 (colours) uses 5.2Mb/frame, and 1280x716 it is 2.8Mb/frame.  Most videos run at 30 frames/second (fps), so 5.2Mb/frame burns up over 150Mb of disk space per second.


If your computer and hard-drive can write out 35Mb/second, then running at full resolution means your computer can write out about 6.7 frames per second.  But at the lower resolution, you can write out 12.5 frames per second, assuming the graphics card and computer viewer can also show the scene that fast as well.  Since you are ultimately going to throw away some of the pixels, why not do it as you record rather than having fewer overall frames.

Story and Choreography

Before you can shoot your first video segment, you need to figure out what a segment actually is.  This truly means going back to basics and thinking about the story you want to show.  What exactly do you want to show?  In my "Expressions of Imagination" video I simply wanted to have a fly through of the natural areas/sims of Second Life. 

The next task is to pick the music.  Sometimes the music drives the story, so the order you do this isn't important.  When you decided on the music, make sure it is something you can listen to over and over, perhaps 100 times by the time your done.  What music works?  Well, all music works, it's just a matter of how the music works with the scenes and who your audience is that makes a difference.

While some people just use the music as a background to the scenes, choreography is a subtle and often overlooked ability that everybody can use.  Whatever music you use, you need to listen to it at least 3-4 times minimum to pick up where all the transitions are.  In the video example below, listen to where the scenes change to give you an idea of how powerful this can be.  But then watch it again listening to your favourite music.  It doesn't lake long before you realize just how much difference the music and the choreography makes to how you feel about the result.

In Vegas, I use the "M" key as I am listening to the music to put in a marker.  If the music is stopped, you can use the "M" key to add a point and give it a text label, like, "music transition".  When listening, it puts in a marker without a label.  If you click the number at the top of the bar, you can right click it and select "Rename" to add your own label later.  When you put in your your video scenes, the video snaps to the marker lines, making it easier to position your segments and set your music or scene fades.  In general, I rarely name the markers.

Vegas with the music marked up (using the "M" key)


Second Life Mouse and the Initial Camera Setup Position

At this point, it is time to learn the Second Life Mouse Keyboard short cuts, as you will need this ability to set up your initial camera setup position.  There are three keyboard short-cuts you'll need to learn and become an expert in.  To use the controls, position your mouse, press the keys, then click the mouse.  The short-cuts do the following:
  • ALT - Zoom & Left/Right Rotate
    • Mouse Up/Down - Zooms
      • You can also use the mouse wheel to zoom in and out, but with the ALT key, the zoom is smoother, and makes positioning more precise.
    • Mouse Left/Right - Rotates left to right.
  • CTRL+ALT - Rotate
    • Mouse Up/Down - Rotates up and down
    • Mouse Left/Right - Rotates left to right.
  • SHIFT+CTRL+ALT - Pan
    • Mouse Up/Down - Pans top to bottom.
    • Mouse Left/Right - Pans left to right.
You use these controls to position your initial camera position some place in Second Life.  Now with your joystick enabled, click the fire button.  In the lower part of the SL window, you will see "Flycam", to indicate the joystick has control.

Move your joystick in all directions to calibrate it with Second life.  You should only need to do this calibration once at the beginning.  Don't worry about what your view is doing, then click the fire button again to take you out of Flycam mode, and tap the CTRL button once, this resets your camera view back to your mouse view.

IMPORTANT.  At this point, don't move your avatar using the movement keys, because this will reset your camera view, and you'll have to position it again.


Practise, Practise, Practise then GO!

To setup a scene, run through the scene several times before recording.  In the video below, each scene is practised at least 4-5 times before being recorded, and in some cases many more times.  Part of the reason is to make sure all of the scenes parts have been fully rendered.  If they are partially rendered, you'll notice a jitteriness in the video as it tries to download or render what is missing.

Once you are ready to go, click the record button on your computer and record your segment.  Don't worry about any preliminary video or stuff at the end you might capture because we'll be able to chop it out in Vegas.

If you make a mistake, delete the video you just made right away otherwise it's a bunch of wasted space and be confused which video segments to include in your show.

Final Video Assembly

Now you are ready to assemble your video.  First drag your music selection(s) to Vegas and leave about 10 seconds at the start before the music begins.  This allows you to put in some blank space before the video starts instead of starting immediately.  I preface my videos with an appropriate quote, just to set the mood.  When you render you specify how much black appears before the video starts.  I recommend at least 1-2 seconds.

I recommend that you add 3 video tracks.  The top video track is what I call the titling track, and it contains just your titles.  The middle track is your working track (described below) and the bottom track is main track containing the key video segments.

Music with fade-in to first marker
Start playing the music and mark up your music.  In my case, the music I'm using a piece of music that is 10 minutes long but only want to use the middle 5 minutes.  In Vegas, I can chop off the beginning by expanding the track and about 1/2 way down the track, the crop tool appears (I couldn't get a screen shot of it but it is a box with a left/right arrow in it.)  Click the left edge then drag to the right to cut the music.  Alternatively you can select the music and click "S" to split the music at that point.  Next, fade the music so it starts with no volume then increases to full volume where you want it to.

Video Fade-In with Music
Now add your video segment to a new track, and using the same cutting tool, click the left edge and begin dragging it to the right.  When you do, you will see exactly the frame where you are cropping the video.  I mentioned before that it didn't matter that there was crap at the beginning of your video segments, this cropping ability works on video to, and this is how you get rid of it.

Next, use the same marker you use to fade-in the music to fade in the video.  In the image to the left it is a little hard to see, but there is a fade-in line show the video.  This will cause the result to start back, then fade to the full brightness of the scene.  In subsequent video, overlaying the video will automatically fade from one to the other.

After you have faded in the video, you'll want to make sure you show enough of what you are working on to show in the video.  In my video below, I use a velocity curve because I want to run quickly through a scene.  Right click the segment and select "Insert/Remove Envelope", then select "Velocity".  Next place the cursor approximately between the fade points of the next video, then adjust the velocity so that the ending frame is where the cursor is.  Half way through the fade is roughly when you'll see the last of your segment.  In the image to the left, you'll see a green line running through the frame.  Practice will tell you the real location because it depends on the actual length of the fade.

Once you have the velocity set, crop the left edge of the video frame to align with the far right mark representing the end of a fade point.  In my case, I do this on the working track above the main track to facilitate this:
Editing in Vegas, Showing the Working Track above the Main Track
It's simply easier to crop and set the velocity on this track.


Now you drag your segment down on to the working track and Vegas will automatically put in the appropriate fades from one segment to the other:

A video segment overlaying two others and seeing the
fade automatically added between the segments

The rest is just hard work, tweaking and playing with the options to produce the effect you want.

Rendering your Video

Finally it is time to render your video.  I render to Windows native Media Video format (wma), and these are the settings I use:
  • Audio: 192 Kbps, 48,000 Hz, 16 Bit, Stereo, WMA9.
  • Video: 29.97 fps, 1280x720, WMV V9 CBR Compression, Smoothness 90

Testing the Video

Testing your video is where you make sure there are no glitches introduced.  Like not setting the right region, etc.


Uploading the Video and Showing it to the World

Finally it is time to upload the video, and all of your hard work will have paid off when you show it:
"Expressions of Imagination" (High Def Link)

Monday, August 9, 2010

The Chamber wins 2nd Place in UWA 3D Art & Design Challenge

Phi Designs' Gin(gered) Alsop wins 2nd place in the IMAGINE Challenge with 'The Chamber' a wonderfully immersive piece that had many a visitor lost inside in awe for hours.

Read all the online details found here.

Friday, July 23, 2010

3 months and counting

Well, it's official ... sort of.  3 months as of today is when I open Phi Designs.  First, I was blown away by the response to the Chamber way back in November 2009 when it first came into existence and I was working out the bugs.  It was fully tested by January 2009 and then realized it need a LITE version.  One where people could by patterns and just plug them in. 

I would have done that then had real life not slapped me hard against the face.  Went down a 4 month journey of doctors and hospital stays.

When I came back, I realized that I needed a LITE version of the product, so I modified the notecard system to include a script instead.  This prevents an unscrupulous individual from reading the notecards and figuring out how the system works.  Not that the notecard helps a lot ... I tried to take the parameters as easy to use so that the user doesn't need to be a programmer.  Because to do the same thing with a script requires a huge understanding of how second life works and all those details are hidden away to make it easy to do.

Originally I thought I could start making a profit after 3 months.  Hasn't turned out that way.  I made more in the first month then all previous selling attempts in the previous 2 1/2 years in SL.  Fabulous.  Thank you all!!

Saturday, July 3, 2010

And not ...

So a few weeks ago, I thought I'd redesign the Phi Designs store to feature more of my products and have an easy way to get to The Chamber.  Turns out I couldn't have been more wrong.  Seems seeing is believing.  People won't buy what they cannot see, and when they see The Chamber for the first time, they jump at it.

Within a day of remodelling the store back to something similar to what I opened with, I made a sale of a professional version.  That brings the the total professional sales to 6 with 2 freebies ... wedding gifts to two dear friends of mine who have found the magic of love from each other.  I wish Christi and Slomo all the best.

So I've decided to keep the store in the new state, and chalk one up for the hard learning ... no sales really for the entire time the store was remodelled ... oh well.  I guess you have to learn the hard way sometimes.  At least I was blessed with a sale early after the change to know I did the right thing in the end.

- Gin

Friday, June 18, 2010

Phi Designs - Remodelling our existing store ...


It's an attempt to make the store more appealing.  We'll see how it goes.  :)

- Gin

Wednesday, June 16, 2010

Customer Service Informant (CSI)

The Phi Designs Customer Service Informant (CSI) is a set of devices used to inform staff about customer activities in one or more of your stores or other locations within Second Life, and alert staff who are online and available. We all know that if you are present when a customer is in a store, you have a greater chance of making a sale, than if the store is empty.

At a minimum, they allow you to create visual presence in a store, using “Staff Identifiers” to reveal you as the owner and staff who might be able to assist the customers. You can get more sophisticated with the “Customer Alert Mat” which alters you to come to your stores if you are available online. Finally, using channels, create combinations of staff that respond as a group to your customers.


The devices are:

STAFF IDENTIFIER (no transfer) - Is a 2 primitive object that identifies each of your staff members in your store and whether they are online (green), offline (red) or optionally unavailable (blue/red shade). The device also automatically forwards notecards dropped on it

CUSTOMER ALERT MAT (no transfer) - is a 1 primitive object that captures individuals who walk over them, and manages whether a messages should be sent to staff if no staff are present in the location.

OPTIONAL OBJECTS (Non-Permanent)

AVATAR UUID KEY REPORTER (no modify) - is a 1 primitive object that you use to get the UUID of an avatar if you do not use an SL browser that can conveniently get your staff UUID's for you. You rez it next to your staff member, touch it, then select the member from the list to get their key. When you have the keys of your staff, you can remove the object.

TITLER (no copy) - is a 40 character wide titling system that allows you to take a screen shot within Second Life with text below the head shot of your staff. This is for purchasers who do not have Photoshop, Gimp or another image editing tool to augment the headshots of their staff. CSI includes 2 TITLER objects (no copy, no transfer) Each titler line is 10 prims and can accommodate 40 characters. If the text is less than 40 characters, it is centered. Once you are finished with the titler, you move it back into inventory.

Customer Service Informant Setup
There are three types of setup: BASIC, FULL and ADVANCED.

BASIC SETUP

The most basic CSI setup involves simply deploying individual STAFF IDENTIFIER devices. Each Staff Identifier device requires a notecard with a series of parameters set up. You simply place as many STAFF IDENTIFIERS as you need for each member of your staff.

FULL SETUP

A full setup involves adding one or more CUSTOMER ALERT MATs to your store, usually at the entrances. The CUSTOMER ALERT MAT does nothing without Staff Identifier devices. In my store, I control access to the store through an open doorway. The customer has to pass through the doorway to access the store, and as they walk through, the MAT picks up on who walked in.

You'll want to place the mat on the floor or make the mat large, rather than making it a thin vertical object they pass through. The reason is because staff members will arrive at the store, and need to hit that object in order for the system to stop alerting other staff. While the object you get in the pack age is WHITE, you can show/hide it with a command line option. By default, you use "/55555 HIDE" and "/55555 SHOW" to hide and show the mat.

ADVANCED SETUP

A more sophisticated setup involves using ALERT CHANNELS. For more information, see that section below.

STAFF IDENTIFIER -- FEATURES & SET UP
The Staff Identifier is a 1.25 meter square object consisting of two prims, which can be resized to your liking. The outer prim gives the status of your staff member, while the inner prim simply identifies your staff member using a head shot.

When a customer touches the Staff Identifier, one of two things happen. If the staff member is online, they are summoned to the location. If they are not online or unavailable, the system tells the customer to create a notecard and drop it on the object.

When an object is dropped on the Staff Identifier, it is confirmed to be a notecard, then it is forwarded to the staff member, or if you have a FORWARD specified, to that person instead. The Staff Identifier only accepts notecards. All other object types are deleted, and if that happens, the customer is informed of the action.

If a staff member, owner or manager touches the Staff Identifier, the system toggles between OnLine/OffLine to unavailable. If staff are not allowed to set their Unavailability, it resets the object. This is used when settings have been changed.

When you configure the Staff Identifier for one of your staff members, you modify the "!Parameters" notecard inside the object. The notecard contains a series of parameters that describes the operation. Parameters have the format of “VARIABLE=Value”. The variable can be upper and lower case, and the value cannot. If you include spaces around the variable and value, they are automatically trimmed.

The following is a sample of the variables that can appear in the note card. If the line is prefixed by a "#", in the notecard it is considered a comment and ignored. In the sample below, the lines that beging with a "#" are optional parameters, with the value specified as the default. Note: With the exception of the AlertChannel, which is auto generated for your sim and parcel name.

###############################################################
Name=Staff Name and/or Title
key=d7513f10-857d-8764-1587-c59ab2cb10db
Store=The Chamber (MAIN)
URL=Lionheart Scar/112/185/31

# AllowUnavailable=Yes
# Forward=d7513f10-857d-8764-1587-c59ab2cb10db
# Manager=Name 1
# Manager=Name 2
# Ignore=Ignore 1
# Ignore=Ignore 2
# AlertChannel=-500000
###############################################################

NAME - This variable controls the name and/or title of the staff member. We recommend that you use their first name only, instead of their full name. But any value you want to include will work.

KEY - This is the avatar's UUID. It's required to send messages, dialog boxes and notecards to the avatar. When a customer clicks the Staff Identifier, the a message is sent to the avatar (if they are logged on), otherwise, the person who clicked it gets a message saying that member is offline or unavailable.

STORE - Is the name of the store where the avatar clicked the Staff Identifier. This allows you to deploy the Staff Identifiers in multiple store locations. When a message is sent to a staff member, they'll know what store they are going to.

URL - Is the "SIM/X/Y/Z" coordinate that you are sending your staff member when a customer clicks the Staff Identifier object. It is prefixed by "secondlife://" so in the sample "secondlife://Lionheart Scar/112/185/31" appears in Local Chat, and the staff member can click on it to open up a teleport window to transfer to that location.

ALLOWUNAVIALABLE - This optional setting allows you to turn off the "Unavailable" feature. This feature allows your staff member to come to the store(s) and indicate that they are unavailable to be summoned by the Staff Identifier. This allows the staff member to be undisturbed when they are not on duty.

FORWARD - This is the UUID of an avatar that receives notecard drops. By default, it goes to the avatar identified by the KEY (described above), however, with a FORWARD, all notecards go to the person you identify with the FORWARD. This allows one person to receive all or most of the notecard requests, rather than individual staff members dealing with them. A FORWARD does not affect how the staff are alerted by a customer.

MANAGER - When an avatar touches the Staff Identifier, it identifies whether the person is the Avatar identified by the KEY, the owner of the object, one of many managers or just a customer. When the owner, staff member or a manager touches it, it can toggle the staff member's status or reset the object. IMPORTANT: You specify managers by name, not their key.

With managers, you can specify them all one one line (separated by commas) or several lines:

Manager=John Doe,Peter Smith
Manager=Albert Jones

is the same as:

Manager=John Doe
Manager=Peter Smith
Manager=Albert Jones

IGNORE - This is a list of the names of Avatars that you should ignore if they touch or otherwise trigger the device with. The list prevents unwanted traffic from certain individuals who might use the presence of the Staff Identifier to harass you or one of your staff. Any action involving these named avatars are simply ignored.

ALERTCHANNEL - This is used in conjunction with the Staff Identifiers and the Customer Alert Mat. The value is a communication channel (+/- 2 billion), that identifies the channel that associates the mat with one or more staff members.

For example, suppose you have staff that supports planes and other staff that support parachutes. You can clump all the staff together, but using different ALERT CHANNELS allow you to control which set of staff are notified when a Customer Alert Mat is touched by a customer. NOTE: This parameter is also used in weird cases where the auto generated channel conflicts with another owner on the current or adjacent SIM.


CUSTOMER ALERT MAT -- FEATURES & SET UP

The Customer Alert Mat is a typically hidden object that you place at the entrance to your store, or to a section of your store. It should be an object that lays on the ground, rather than an object that is vertical. The reason, is if your staff teleport to a specific location, they may miss the

When you configure a Customer Alert Mat, you modify the "!Parameters" notecard inside the object. The notecard contains a series of parameters that describes the operation. Parameters have the format of “VARIABLE=Value”. The variable can be upper and lower case, and the value cannot. If you include spaces around the variable and value, they are automatically trimmed.

The following is a sample of the variables that can appear in the note card. If the line is prefixed by a "#", in the notecard it is considered a comment and ignored. In the sample below, the lines that beging with a "#" are optional parameters, with the value specified as the default. Note: With the exception of the AlertChannel, which is auto generated for your sim and parcel name.

NOTE: For the STAFF, MANAGER and IGNORE parameters, you can specify more than one value, and specify several avatars on one line when separated by commas or if you prefer, one line per entry, for example:

Manager=John Doe,Peter Smith
Manager=Albert Jones

is the same as:

Manager=John Doe
Manager=Peter Smith
Manager=Albert Jones

###############################################################
# AlertName=Store Entry

# Manager=Staff Manager 1
# Manager=Staff Manager 2
# Listen=55555

# Ignore=Ignore Avatar 1
# Ignore=Ignore Avatar 2

# Staff=Staff Member 1
# Staff=Staff Member 2

# Offset=1.2
# SensorRadius=20
# SensorDuration=60
# AlertChannel=-500000
###############################################################

ALERTNAME - Alert Name identifies the mat that was touched by an avatar. Typically it is at the front of the store, but it could be near a department.

MANAGER - These are the names of the individuals who, in addition to the owner can show and hide the welcome mat. This is used in conjunction with sharing the mat with the group. Where all the listed managers are in the group. It allows them to update Manager, Ignore and Staff settings in the notecard.

LISTEN - Is the channel that the owner and managers use to show and hide the mat. With the default of 55555. to show the mat, type “/55555 Show”. To hide the mat, type “/55555 hide”.

STAFF - Are the names of the individuals who are considered the staff for the store and provide some kind of customer support. You must include the owner and managers in this list if they are to provide support. The mat scans every minute, by default, for avatars that are within a specific distance of the mat. If staff are present, no other online avatars are informed of customer arrivals. If staff are not present, the mat sends a message to Staff Identifier objects indicating that there are customers in the store until a staff member arrives.

Once a staff member walks onto the mat or gets into the store within 20m, by default, the system automatically identifies that staff who are present and stops sending messages to other online staff members. The first time each staff member arrives, they get a dialogue identifying all the customers in the store, and subsequent times they aren't bothered with additional messages, even if new customers arrive. It's assumed that staff who are present in the store, but aren't assisting other customers have the wherewithal to recognize new customers.

IGNORE - This is a list of the names of Avatars that the mat will ignore if they trigger the device with. The list prevents unwanted traffic from certain individuals who might use it to harass you or one of your staff. Any action involving these named avatars are simply ignored.

Ignore can also used for Staff Members. Suppose you have 4 staff. Two support planes and the other supports parachutes. On the customer mat near the Planes department, you list who the staff are, and the two staff members who support Parachutes are ignored. This allows the two staff members supporting Parachutes to walk into the Planes department and not alert those staff about the presence of them as a customer.

OFFSET - This is a positive/negative number that gives the offset to the center of the mat. When there are no staff members in the store, the system will send a message to the Staff Identifiers and they, in turn, will send a message to all online staff. With the location of the customer mat. In some situations, you may want the staff member to arrive above the center of the mat or below to prevent them falling through the floor to being pushed to an upper floor. Offset, allows you to control this.

SENSORRADIUS - Identifies the distance from the center of the mat to the outer edge where mat scans for avatars. As long as staff are in this sphere, the system assumes staff are present in a store. Default: 20m

SENSORDURATION - Identifies the number of seconds between each scan for avatars. We strongly recommend you do not set this value below 15 seconds, to avoid server lag. Default: 60 seconds

ALERTCHANNEL - This is used in conjunction with the Staff Identifiers and the Customer Alert Mat. The value is a communication channel (+/- 2 billion), that identifies the channel that associates the mat with one or more staff members. For example, suppose you have staff that supports planes and other staff that support parachutes. You can clump all the staff together, but using different ALERT CHANNELS allow you to control which set of staff are notified when a Customer Alert Mat is touched by a customer. NOTE: This parameter is also used in weird cases where the auto generated channel conflicts with another owner on the current or adjacent SIM.


AVATAR UUID KEY REPORTER -- FEATURES & SET UP

AVATAR UUID KEY REPORTER is a 1 primitive object that you use to get the UUID of an avatar if you do not use an SL browser that can conveniently get your staff UUID's for you (such as Emerald). You rez it next to your staff member, touch it, then select the member from the list to get their key. When you have identified the keys of your staff, you can remove the object.


TITLER -- FEATURES & SET UP
TITLER is a 40 character wide titling system that allows you to take a screen shot within Second Life with text below the head shot of your staff member. This allows purchasers who are unfamilar with non SL tools like Photoshop, Gimp or another image editing tool to augment the headshots of their staff with text. CSI includes 2 TITLER objects. Each title line is 10 prims and can accommodate up to 40 characters which are automatically centered in the space provided.

To use the Titler:

(1) Right click the Titler, then select “Edit...” from the menu.
(2) Click the “General” tab, and change the description field to the text you want to display.
(3) Close the Edit window.
(4) Left-Click the Titler, and a dialog message will appear. The options are shown below.

TITLER DIALOG OPTIONS

0.01m, 0.05m, 0.1m, 0.25m, 0.5m - Sets the scaling factor for the device. The default is 0.1m. This value is added or removed from the DEPTH or HEIGHT of elements in the titler.

MIN DEPTH - Used to set the minimum depth of the titler object to 0.01m. This the smallest possible value for a primitive.

+DEPTH - Adds the scaling factor to the depth of the title. This is used when you want to scale the TITLER down from it's current size.
-DEPTH - Removes the scaling factor from the depth of the title. Not used frequently.

+HEIGHT - Adds the scaling factor to the height of each item in the title. This is used when you want to increase the height of the letters.
-HEIGHT - Removes the scaling factor to the height of each item in the title. This is used when you want to increase the height of the letters.

FILL - Fills every character with a “#” character. This makes it easier to see the size of the characters when scaling.

DISPLAY MSG - Displays the first 40 characters of the message contained in the Description Field.


QUICK SETTING OF THE WIDTH AND SCALE OF THE TITLER

The dialogue doesn't support setting the width, but you can do this by setting the scale (as described below), then adjusting the height to an appropriate value.

(1) Right click the Titler, then select “Edit...” from the menu.
(2) Hold down the Ctrl and Shift keys. You'll notice 8 handle boxes appear at the corners of the object.
(3) Move your mouse to one of the handles, then LEFT-CLICK and hold the mouse button, then, to scale the title.
(4) Close the Edit Box.

Note: If you discover you cannot scale the object smaller, close the edit box, click the titler and select +DEPTH. Rescale the TITLER, then go back into the menu and select “Min Depth”.

Followers