This is going to be one of those work in progress posts that describes how I became a DJ in Second Life. I've wanted to do this for some time, and as it turns out, already had all the tools to do it without one plug-in which I have now obtained.
Firstly, I use an Digital Audio Workstation (DAW) called Reaper (
http://reaper.fm). A DAW is an audio composition tool for overlaying multiple sounds. It's what professional composers use to produce the music you listen to, and can run into the thousands of dollars.
Reaper is normally $225, but if you make less than $20,000/year from your music, they will sell you a discounted license for $60. Don't let it's price make you think it is sub-standard; it's amazing quality for what you get. As well, there is new release with new features every 2 weeks, so one license gets dozens of upgrades for free.
For me, I would pay more than $225 for it, because it provides me with features that $1000 DAW give. I started out with Sony ACID Studio and Pro, but found I couldn't run two Virtual Instruments (VSTi) at the same time. I got turned on by the richness of sounds from Spectrasonic's Stylus RMX and Atmosphere (and later Omnisphere), and you can sync the beat track of RMX to Omnisphere. But not having a tool means those programs are worthless.
Reaper is way more functionality than most people need to be a DJ in SL, but it does offer three huge benefits that other posters overlook. Cross Fading, Rendering and Projects. These are all part of Reaper, so there is no need to get a ton of technology and figure out how to make it happen.
Cross Fading is the ability to end one piece of music while beginning another. Doing this can be done graphically ... by simply dragging one piece of music visually over the other and you're done. Cross Fading can be a bit of a challenge if one song has a bunch of silence a the end or at the beginning, so in Reaper it easy to cut stuff off the beginning and end of a song before you do the cross fade.
Rendering is the ability to take your completed show and render it as a single result, and that result can be any in any audio format you want.
Projects are the ability to save your 2 hour sets so that they can be reloaded and played back easily. For me, this means producing a set of shows that I can use in other venues, or at least that's the idea.
Since Reaper is a DAW, I can also remix songs with it. I've never had the need/ability to techno-fy my chill-out music, but with tons of that kind of music it will be an interesting experiment. One of my VSTs is RMX which allows me to overlay beat tracks to the sounds. Omnisphere also has beats, but it's more of a synth designed for smoother sounds, plus millions of combinations of sound possibilities. That means I can mix the sounds together and play them back live into SecondLife for a really special result.
Kbs (Kilobits per Second)
Back in the day when CDs were first created, the CD format allowed for 72 minutes (and later 80) of sound. Rumor has it that it had to be long enough to fit one of Beethoven's symphonies on it uninterrupted.
It used 44,000 Khz and 16-bit stereo sound in a raw format eating up 176,000 bytes per second of CD space, or requiring 725 Mb for the 72 minutes of time. To transmit a byte on the Internet, 2 extra bits are used, so 176,000 bytes/sec, 1,700 Kilo bits per second (Kbs).
That's a lot of bits to push around, and unacceptable as a medium for transmitting sound over the Internet. But since then, different audio formats have come along that use a lot less bits to transmit the music. Seems our ears aren't all that great for hearing the high and low ends of the music, so it's wasteful to transmit them. New formats can stream out a similar but still high quality sound using only 128 Kbp, over 13 times less space.
iTunes
I use iTunes to organize my music library, because it reads most formats and I can convert them into MP3's which I use to broadcast with. I use a global playlist contains all of the tunes that I create my sets with. I don't use Genre in iTunes because I have Trance, Dance, Breaks, Progressive House, House, etc. in my sets.
Before you can convert to MP3, you have to tell iTunes that is the format you want. To set it, go into Edit ::: Preferences, and select
Import Settings:
Then from the next dialog, select MP3 Encoder from the "Import Using" drop down:
Next I start playing the play list and go into shuffle mode to play the playlist in random order. This gives me a random selection of tunes. If there is a tune I like that isn't MP3, I can convert it to an MP3 version.
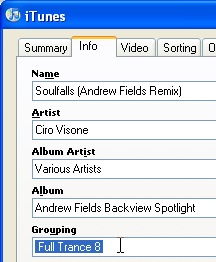
Once I have the MP3 Version, I update the "grouping" to identify which music goes into what sets, and I can prevent the same piece of music from being reused so that there is a unique show each time. By going into "Get Info" (a little further up the menu shown here), and setting the grouping. Now I can sort by the grouping and see all the music in a set:
This process simplifies the set arrangement process by ensuring that I get all the musical pieces in a single group. If you want to order the compositions for arrangement, see below, suffix the grouping name with a number like "-01", "-02","-03", and so on.
Once you have a set of music, you can figure out how much time you have for it. First, make sure you have your music library selected and not a playlist, by selecting Music under Library:
Then select all the tunes in your grouping, and at the bottom of the iTunes window, it will give you this statistic:
If it doesn't give you the precise time, then click the area first to switch the value to an exact time rather than an approximate time.
I always make sure the amount of time is about 2 minutes more than the set time, so that I can handle cross-fades and get the set time to exactly where I want it 2, 3 or 4 hours.
The Annoucer (Optional)
While Shoutcast supports the ability to announce whatever the current tune is, reaper doesn't. Even if it did, I don't like the detail it gives and a viewer has to be able to support reading the stream. Therefore I wrote my own shout cast Announcer which is part of my tip jar. If you want the script, then send me a notecard IM in game and I'll arrange to get it to you. The script took a lot of time to write and has a fee and will eventually be available in the Second Life Marketplace.
My song announcer reports this information in this format using the special second life characters:
╔╦═════════════════════════════════════════════════════
║╟─✸ Set: Progressive Dance 1
║╟─✸ Song: 3 of 17
║╟─✸ Name: Endless Candy - Original Mix
║╟─✸ By: Weekend Heroes
║╟─✸ Album: Armada At Ibiza - The Closing Party 2010
╚╩═════════════════════════════════════════════════════
The SET is the name of the set of songs being played, and Album gives the release I got it from so that others can more readily find it.
To get this information into second life requires an export from iTunes and a different one from Reaper. I then edit the output using OpenOffice and then read the two sets using a Second Life script.
iTunes Export for Announcer (Optional)
The first step is to get all the tunes from the set into a play list. This is an easy drag-and-drop process to create the playlist. Once you have the playlist, right click the name and select "Export..." from the menu:Pick the first option in the type "Text Files (*.txt)" and specify an appropriate name. I use "ITunes-PLAYLIST" .. so, "ITunes-Progressive Dance 1".
I then export the file again, but instead of saving it, I right-click the file I just created, and use the "Open With" ability and open it in Open Office. This saves having to fine the file after it is saved.
I then specify the Separator options as Tab:
Then click OK to open the file. There are are four columns we need from this file, so all the columns except for:
- Name
- Artist
- Album
- Location
Are deleted from the file. Location is used to cross reference a start time in the Reaper file.
IMPORTANT PRIVACY NOTICE: Before continuing to the next step, have a look at the names contained within the Location column. Since this file will eventually be copied into Second Life, MAKE sure it doesn't contain any personally identifying information. In my example, I use a separate hard-drive partition (P) to save details about my songs, but many people use "My Documents" and this often contains your real name. My recommendation is to use a "replace" operation to change the name of any private information. Whatever modifications you make, they have to be consistent, because the system matches against the FileName column in Reaper against the Location name in iTunes. If they are not the same, the load fails. See below. |
Review the columns to make sure all the information you want is included, then save the file using the type "Text CSV (.csv)" and remember to check on "Edit Filter Settings":
By clicking on Edit Filter Settings, you get another dialog box. Specify the field delimiter as a tilda (~) and the text delimiter as nothing:
Then click OK to save the file.
iTunes to Reaper
Now start up Reaper, start a new project, add a track, and drag the all the files to the track in reaper. In iTunes, click and hold the left-hand mouse button, then drag to the right the files. This will pop open a drag image identify the number of tunes you are dragging:
and drag the files to the left-hand side of the Reaper track:
It will ask you if you want the files on a single or multiple track, click "NO" to put everything on a single track:
Now Reaper then lays down all the audio track side-by-side. They appear red in this image because I have changed the colours in my environment.
The next step is to cross fade the selections. The first stage is to trim off low volume parts of the music at the end (or start) of a musical selection. Move your mouse to the edge of a song and when you see this cursor, click and drag the mouse left/right to trim the music:
TO:
Now start playing the music. Doesn't matter were exactly, just that it has to be playing, and drag the music so that it overlaps, and let go of the mouse. When you do the music position is moved a little to the left of the cross fade so you can hear the entire cross-fade.
Listen to the fade to make sure it sounds correct, or shift the starting point/overlap until it sounds good. Some times you have to turn snapping Off (Alt+S) to make it align better.
Now repeat the process for the entire set, and save the project. Now listen to the set and make sure there are no glitches in the music and is what you want it to be.
Reaper Export for Announcer (Optional)
This is the second half of the export required to seed the script in Second Life with accurate song, artist and album information. Inside Reaper, after saving the project as an RPP file. Save it again:
And save it as a "EDL TXT (Vegas) (*.TXT)" File type. I prefix the file name with REAPER to differentiate it from the iTunes export files:
Like the iTunes export, save it again as TXT and use the Open With to open the file in Open Office. This time open with semi-colons and make sure TAB is turned off!!
Delete all the columns except for:
- StartTime
- FileName
IMPORTANT PRIVACY NOTICE: Before continuing to the next step, have a look at the names contained within the Filename column. Since this file will eventually be copied into Second Life, MAKE sure it doesn't contain any personally identifying information. In my example, I use a separate hard-drive partition (P) to save details about my songs, but many people use "My Documents" and this often contains your real name. My recommendation is to use a "replace" operation to change the name of any private information. Whatever modifications you make, they have to be consistent, because the system matches against the FileName column in Reaper against the Location name in iTunes. If they are not the same, the load fails. See below. |
Then do a save as "Text CSV (.csv)" and make sure Edit filter settings is turned on:
In the subsequent dialog make sure the Field Delimiter is a "~" and the Text Delimiter is blank:
Then Click OK to save the file.
Reaper to Shoutcast
Shoutcast is technology that takes an input (your music from Reaper) and distributes it to one or more listeners. Reaper has a plug-in to enable this, and can be found here:
Download the appropriate plug-in for your Windows OS (32 or 64 bits). And save it in the "plugins" directory for Reaper.
Next download the latest "lame_mp3.dll" encoder, which you can find here:
Install this in the same directory as the "reaper" application. DO NOT install it in the plugins directory.
Now bring up the plug-in, by using the "Save Live Output to Disk" (Ctrl+Alt+B), which is found on the "File" menu.
This brings up an initial dialog where you select Shoutcast Source:
You have to click START to see the start parameters. When you signup for a shoutcast service in second life you will get an IP, Host and Password. Simply separate the IP and host with a colon, for example if the IP is "231.77.82.199" and the port is "4212", then Host:port is set to "231.77.82.199:4212". Finally, set the appropriate password:
Connect and when you are connected, simply click play in Reaper and pat yourself on the back .. you are broadcasting!!
It does take 10-30 seconds for your music to leave your computer, be transmitted to the shoutcast server and rebroadcast to the Second Life residents.
Copying ITunes & Reaper Export to Second Life for Announcer (Optional)
The script works only with the files specified above. For each set you copy the contents of the two CSV files you created previously, and copy them into a notecard. In Windows, this is simply, open them in any text editor such as Notepad or Notepad++.
Once opened, in Notepad, press Ctrl+A (Select All) then Ctrl+C (Copy), to copy the text into the clipboard. In Second Life, create a notecard. The notecard name is either prefixed with one of these two to indicate it's type.
After the dash, you place the name of the set. IMPORTANT, the name of the set must be the same on both files:
Open the notecard, and paste the clipboard contents (from Notepad) into the Second Life Notecard:
Repeat the process for the Reaper export file.
Now, make a copy of each of the "!Tunes" and "!Reaper" notecards in an object with the "!!Shoutcaster" script you acquired earlier.
Using the "!!Shoutcast Announcer" Script (Optional)
The "!!Shoutcaster" script uses the command line on channel "555" to work and only supports the Owner of the script, so somebody else typing these commands, beside yourself will have no effect on the script. There are 4 commands, and they are listed in roughly the order you would use them. The commands can be in upper and lower case. For example "/555 Stop"
LOAD tells the script to load a set from the notecards present. Loading first loads the Reaper notecard which gives the start times and sequence of the tunes and then it loads the ITunes notecard which gets the song name, artist name and album information using the filename as the cross-reference between the two. The name you provide is your set name:
- /555 load Progressive Dance 1
- Loads the "Progressive Dance 1" notecard for iTunes and Repear
DELAY is the combination of two numbers. The default is 45 seconds. The first number is the number of seconds it takes for your sounds to leave your computer, travel to the shoutcast server, then end up on your listeners computers. In my case, this is about 25 seconds. The second number is the number of seconds into the tune before the script identifies the song. In this case, it is 20 seconds. Total 45 seconds.
To change the delay, simply specify a new value.
Sets the new delay to 33 seconds.
SYNC is used to tell the script where in the song Reaper is currently playing. You look at Reaper, and decide upon one of two formats for the SYNC command. The timer contains beats and seconds, seperated by a "/". We are interested in the value after the "/". It accepts a time with minutes and seconds (MM:SS) or with hours too (HH:MM:SS):
 | Contains just the minute and seconds. Ignore the stuff after the ".". The sync command therefore is:
/555 sync 12:24 |
 | Contains the hour, minute and seconds. Ignore the stuff after the "." and the sync command therefore is:
/555 sync 1:48:56 |
Since these commands are being entered as Repear plays, you will need to enter a value up to 10 seconds in the future, and count down your "ENTER" key press in Second Life when the time matches. Once this occurs, the script will then play the current song that is playing according to Repear's current position and relative to the delay value you have specified earlier.
The SYNC command doesn't need to be incredibly accurate, it can be out by a few seconds, because different avatars in second life will receive your sounds at different times because their distance from the Shoutcast server. This is why the default delay is 45 seconds and not 25.
STOP stops the script from broadcasting the current song. Stop automatically happens after the last song is annouced.
Final Two Words
Have fun!


